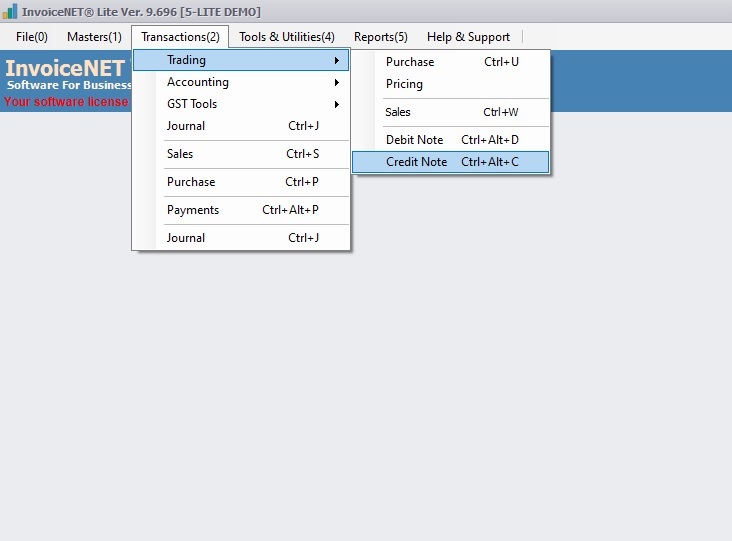
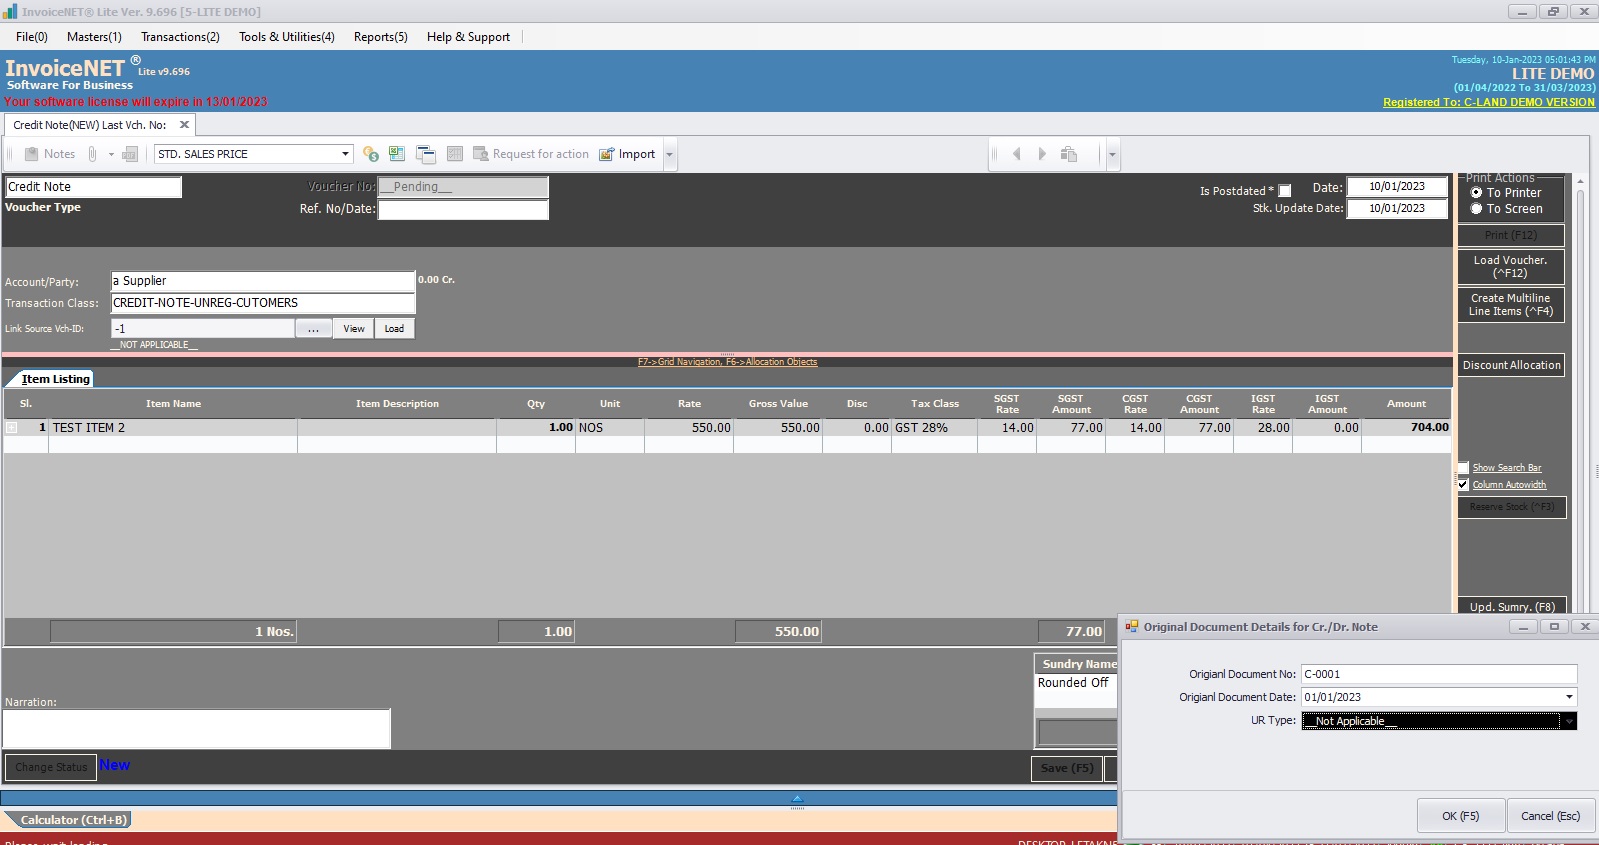
Transactions=>Trading=>Credit Note
A credit note is issued to indicate a return of funds in the event of an invoice error, incorrect or damaged products, purchase cancellation or otherwise specified circumstance.
InvoiceNET® Lite has a credit note voucher type to record this transactions.
Posting to accounts
Credit note voucher posts the accounting values in reverse order of Sales Voucher. It posts the sales values in to the sales accounts as defined in the Transaction Class selected and posts the values to the party/cash ledger as selected in the Account (Party) field. Tax values/discount values are posted to the appropriate tax ledgers/discount ledgers as configured in the Transaction Class or the ledgers configured in the sundries defined for tax/discount calculation. Rest of the values like freight, excise duty, etc.. are posted to the ledgers configured in the Bill of Sundries defined for them.
-
- Step 1
- Click Transactions=>Trading=>Credit Note to create, modify or delete credit note transactions as shown Step 1 figure
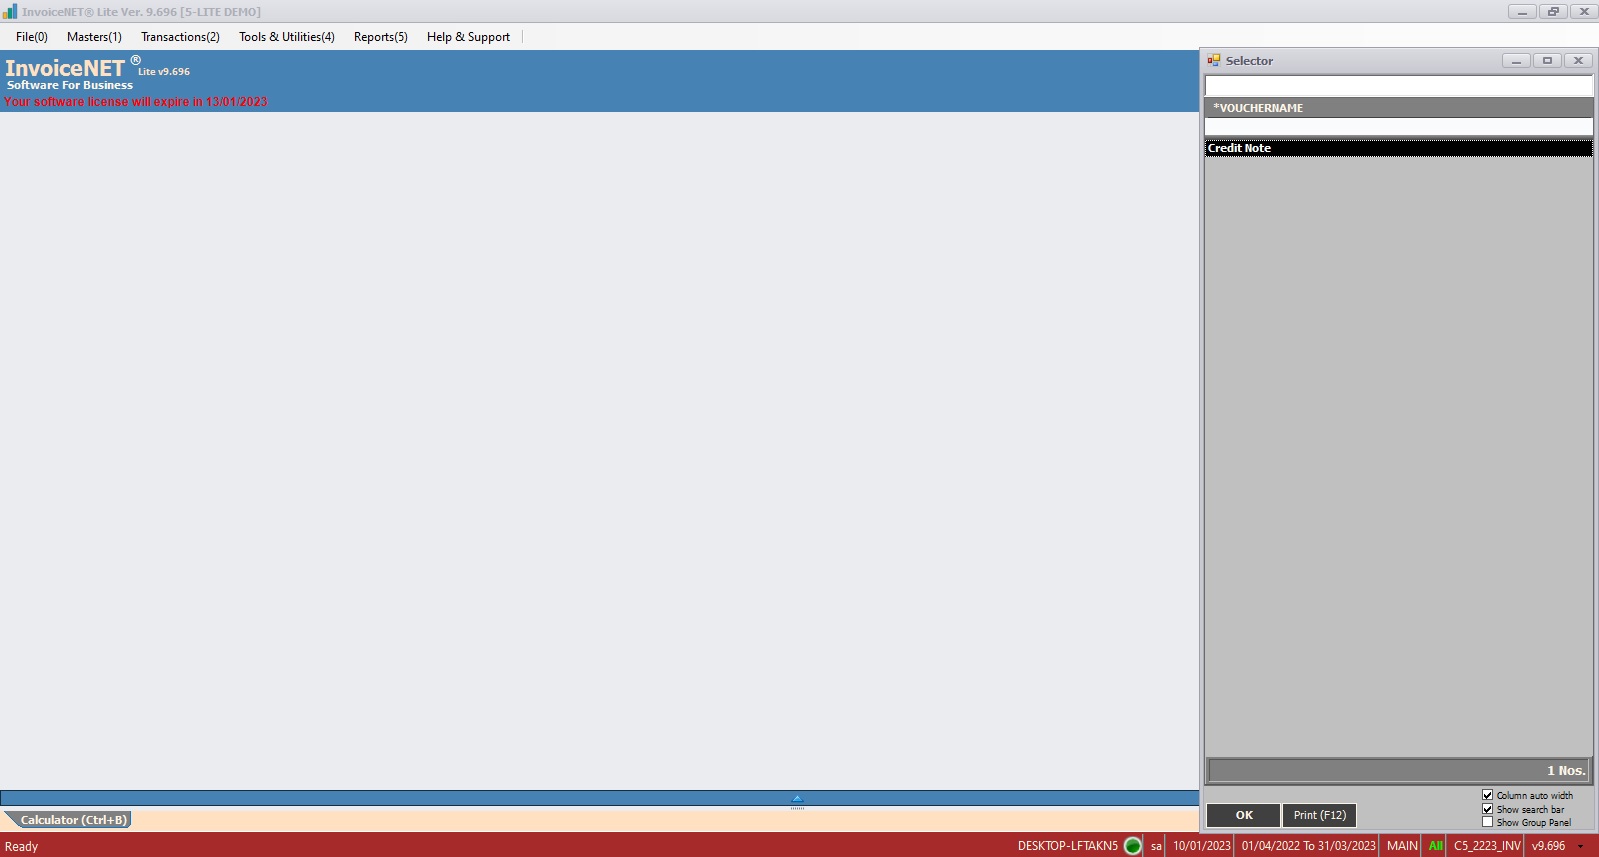
- Step 2
- Now List of credit note vouchers selector window is displayed as shown in Step 2 figure. Select a suitable sale voucher type .
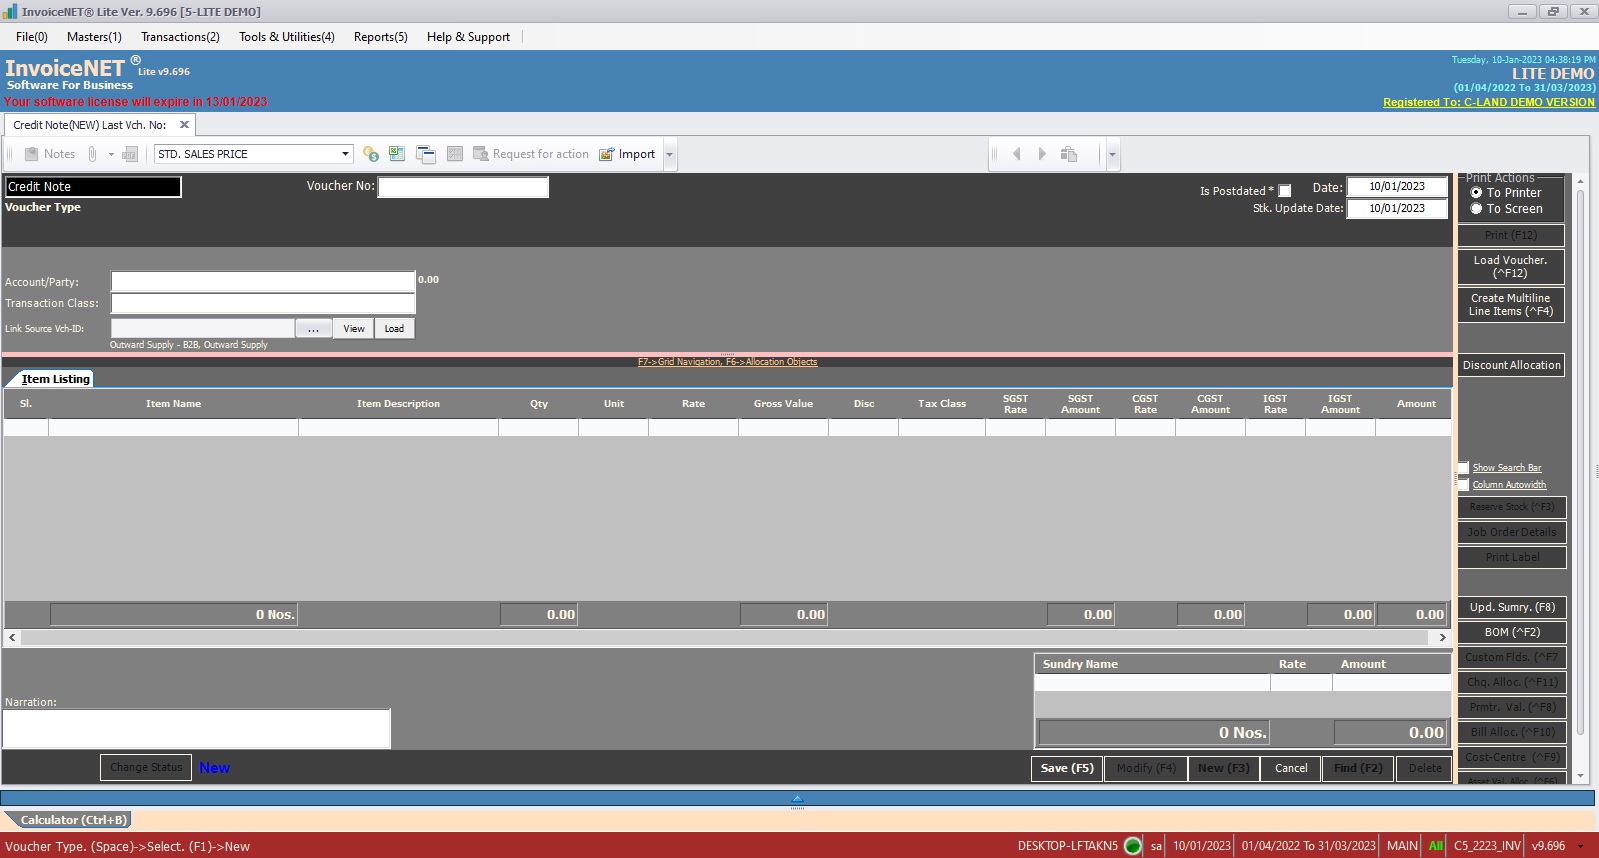
- Step 3
- Now credit note creation window is appeared as shown in Step 3 figure
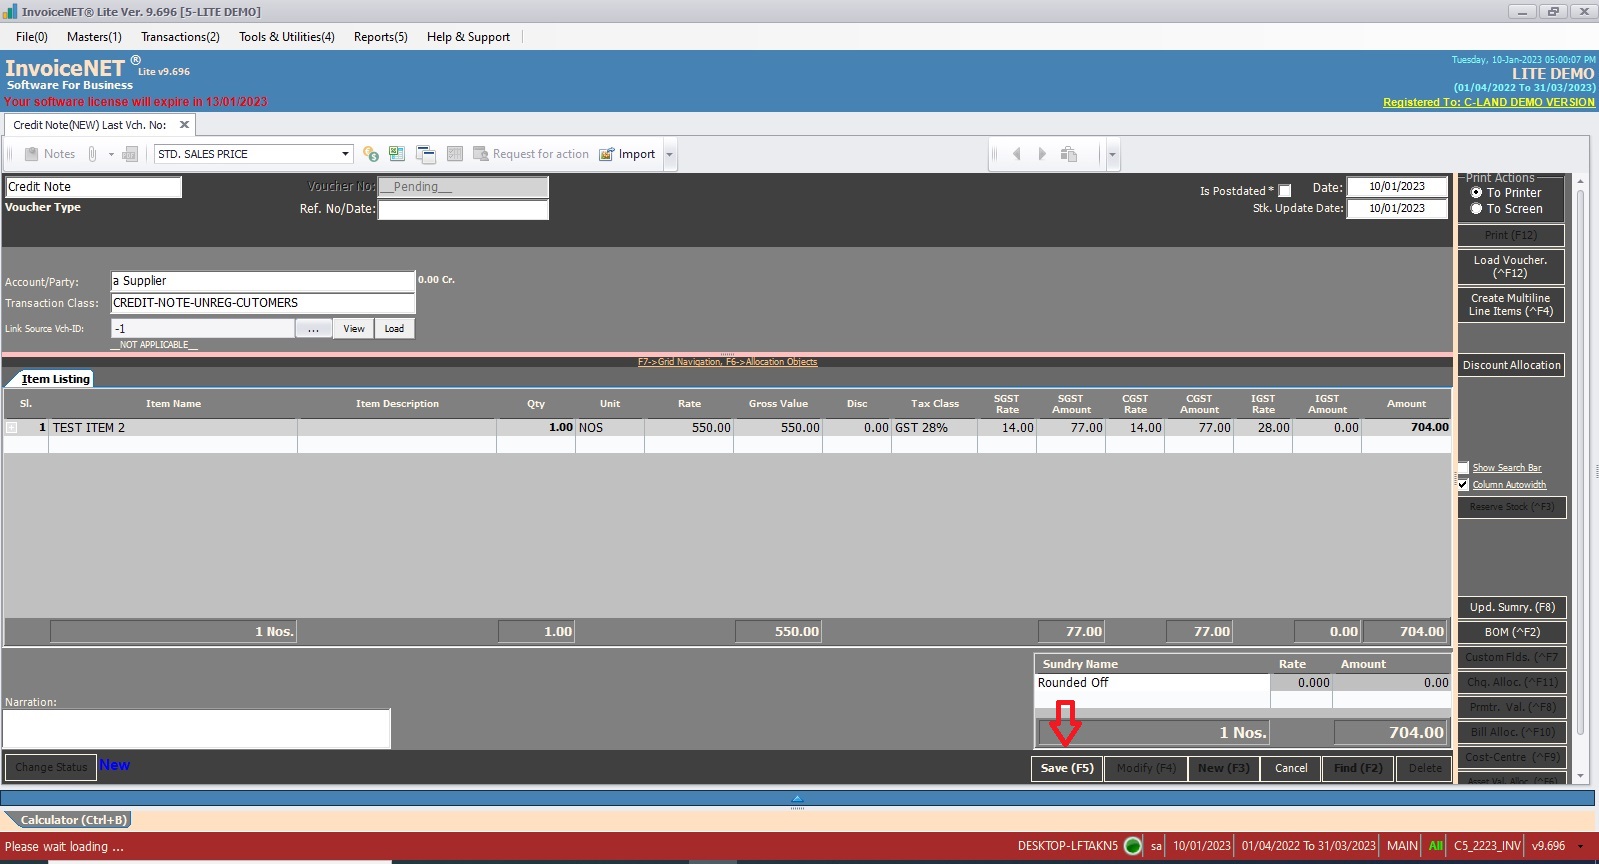
- Step 4
- User have to fill the text boxes as shown in Step 4 figure
- Voucher Type=>By default, this field displays the voucher type selected from the selection list
- Voucher No=>Voucher-No is the primary reference of any transaction. Voucher-No can be ‘Auto generated’ or ‘Manual’ as configured from the voucher manager. If it is ‘Auto’, Voucher No textbox shows __Pending__ until it is saved.
- Ref. No/Date:=>Reference Number is any alternate reference for a transaction apart from Voucher No.
- Date:=>Date stands for the date of transaction for accounting. Current date will automatically displayed.
- Stk. Update Date:=>Stock update date stands for the date of transaction for inventory. Current date will automatically displayed.
- Account/Party:=>The list of Ledgers selected by ‘Set Selection Group’ command button from Voucher manager appears on pressing enter key from Transaction Account Party. If it is a cash sale ‘Cash’ account is to be selected else any ledger account under ‘Sundry Creditors’ is to be selected.
- Transaction Class=>The list of transaction classes selected by ‘Set Transaction Class’ command button from Voucher manager appears on pressing enter key from Transaction Class Textbox.
- Item Listing=>The columns in product entry list can be configured by clicking Inventory Transactions Col. Properties command button in Voucher Manager. The columns with visible property True will be displayed in Product Entry List. The possible columns are as follows.
- Item Name=>Name of returned item. Press space bar to select or press F1 to create new product.
- Qty=> Returned qty of the item
- Unit=> Unit name of the item. It is automatically filled from item master
- Rate=> Rate of per item
- Gross Value=>Qty * Rate
- Disc%=>Discount percentage if any
- Dis. Amount=>If Disc% is given, then calculated discount amount is shown here
- Tax Class=>Tax class of the item. It is automatically filled from item master
- SGST Rate=> If the transaction belongs to intra state, SGST rate is displayed here
- SGST Amount=> If the transaction belongs to intra state, SGST tax amount is displayed here
- CGST Rate=>If the transaction belongs to intra state, CGST rate is displayed here
- CGST Amount=>If the transaction belongs to intra state, CGST tax amount is displayed here
- IGST Rate=>If the transaction belongs to inter state, IGST rate is displayed here
- IGST Amount=> If the transaction belongs to inter state, IGST tax amount is displayed here
- Amount=>Value of returned items including tax
- Sundry List=>It consists list of sundries. Sundries can form as members of a Transaction Class in the Auto Sundry Definition section or they can be selected individually in a voucher.
- Sundry Name=> Select sundry name here
- Rate=> Rate of sundry
- Amount=> Amount of sundry
- Narration=>Description for the transaction. Standard Narration can be selected by pressing Ctrl+S
- Click on Save button or press F5 to save the transaction
- Step 1

